
Archive for the ‘TEChNoLoGY’ Category

Oracle Database 12cR2 Documentation

November 15th, 2017, posted in Oracle
Share

Finally Oracle 12cR2 documentation is here

Also All Books for Oracle® Database Online is here 

Oracle Database 12cR2 Documentation,Oracle Database 12cR2,Documentation,Oracle Database 12c,Oracle Database 12c download,download Oracle Database 12c,Oracle Database download,download Oracle Database,Oracle 12c download,download Oracle 12c,Oracle 12.2 is Now Available on E-delivery,Oracle 12.2, Now Available on E-delivery,Oracle 12.2 is Now Available,E-delivery,


Share

Oracle 12.2 is Now Available on E-delivery

November 13th, 2017, posted in Linux OS, Oracle
Share

Oracle Just Announced the availability of Oracle database 12cR2 Exadata/SuperCluster On their website, In Case you want to upgrade

You can download oracle Enterprise edition 12cR2 from Oracle E delivery
 Here 

Follow the steps :-
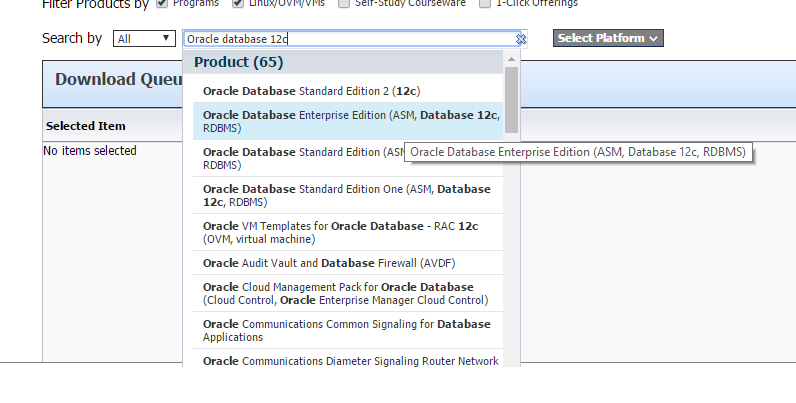
Oracle Database 12c,Oracle Database 12c download,download Oracle Database 12c,Oracle Database download,download Oracle Database,Oracle 12c download,download Oracle 12c,Oracle 12.2 is Now Available on E-delivery,Oracle 12.2, Now Available on E-delivery,Oracle 12.2 is Now Available,E-delivery,

Oracle Database 12c,Oracle Database 12c download,download Oracle Database 12c,Oracle Database download,download Oracle Database,Oracle 12c download,download Oracle 12c,Oracle 12.2 is Now Available on E-delivery,Oracle 12.2, Now Available on E-delivery,Oracle 12.2 is Now Available,E-delivery,

Share

Oracle Database 12c Release 2

November 12th, 2017, posted in Linux OS, Oracle
Share
Oracle Database 12c,Oracle Database 12c download,download Oracle Database 12c,Oracle Database download,download Oracle Database,Oracle 12c download,download Oracle 12c,Oracle Database 12c Release 2 is now available for Linux, Oracle Solaris SPARC, Oracle Solaris Intel 
To Download Just access here 
Share

Find The Inventory Organizations Assigned To Ones Operating Unit

November 6th, 2017, posted in Oracle Queries
Share
SELECT hou.NAME operating_unit_name,Oracle : Size Of Database,Oracle,Size Of Database,Database,data files, redo log files, control files, temporary files,Oracle data files,Oracle redo log files,Oracle control files,Oracle temporary files,Enabling And Checking the Status of Flashback On Database,Oracle Database,Oracle DBA,Enabling Flashback On Database,Checking the Status of Flashback On Database, Status of Flashback On Database, Enable Flashback On Database, Enabling Flashback On Database,Enable Flashback On Oracle Database, Enabling Flashback On Oracle Database,
hou.short_code,
hou.organization_id operating_unit_id,
hou.set_of_books_id,
hou.business_group_id,
ood.organization_name inventory_organization_name,
ood.organization_code Inv_organization_code,
ood.organization_id Inv_organization_id,
ood.chart_of_accounts_id
FROM hr_operating_units hou,
org_organization_definitions ood
WHERE 1 = 1
AND hou.organization_id = ood.operating_unit
ORDER BY hou.organization_id ASC;
Share

How To Reset Password On Galaxy A7 When Locked

October 25th, 2017, posted in Android
Share

How To Reset Password On Galaxy A7 When Locked Out,How To Reset Password,Galaxy A7 When Locked Out,How To Reset Password On A7 When Locked Out,Reset Password On Galaxy A7 When Locked Out,Reset Password On Galaxy A7,How To Reset Password with Samsung Find My Mobile,Reset Password with Samsung Find My Mobile,Reset Password with Samsung Find My Mobile,Password Reset with Android Device Manager,Galaxy A7 with Samsung,Samsung Galaxy A7,

If you own a Samsung Galaxy A7, it’s very common to forget the passcode and then need to reset the password. Many solutions to reset the password on the Galaxy A7 require completing a hard factory reset which can delete all your files and data on the smartphone. For those that don’t have their Samsung Galaxy backed up, we’ve created several different ways to reset the password on the Galaxy A7 when locked out without having to lose data or files. The following is a guide that will teach you three different ways how to reset the lock screen password on the Galaxy A7 when you get locked out.


Reset Password with Factory Reset

  1. Turn off the Galaxy A7.
  2. Press and hold the Volume up button, the Home button, and the Powerbutton at the same time until you see the Android icon.
  3. Using the Volume down select wipe data/factory resetoption and press the Power button to select it.
  4. Using the Volume down highlight Yes – delete all user dataand press Power to select it.
  5. After the Galaxy A7 has rebooted, then use the Power button to select it.
  6. When the Galaxy A7 restarts, everything will be wiped and will be ready to set up again.


Read this guide to learn an alternative method to factory reset the Galaxy A7. It’s important to note that before you go to do a factory reset on the Galaxy A7, you should back up all files and information to prevent any data from being lost.


Reset Password with Samsung Find My Mobile

Another method would be to use Samsung’s Find My Mobile (Find My Android), similar to Find My iPhone. You can use the “Remote Controls” feature on your Samsung Galaxy A7 which will allow you to temporarily reset the password and bypass the lock screen on the Galaxy A7. If you have not already registered the Galaxy A7 with Samsung, try registering it as soon as possible

  1. Register the Galaxy A7 with Samsung
  2. Use the Find My Mobile service to temporary reset the password
  3. Bypass the lock screen using the new temporary password
  4. Set a new password


Password Reset with Android Device Manager

The first way to reset the password on both the Galaxy A7 is for those that have already registered their Galaxy A7 with Android Device Manage. When using Android Device Manger to reset the password, all you need to do is activate the “Lock” feature. The “Lock” feature on Android Device Manger will allow you to get the Galaxy A7 password to reset when you have forgotten the password on the Galaxy A7. Follow the instructions below:

  1. Go to the Android Device Manager from a computer
  2. Find your Galaxy A7 on the screen
  3. Enable “Lock & Erase” feature
  4. Then follow the given steps on the page to lock your phone
  5. Set a temporary password
  6. Enter the temporary password
  7. Create a new password
Share
