Archive for the ‘TEChNoLoGY’ Category

Transferring The DBC File From The Application Server

June 6th, 2017, posted in Oracle, Solaris
Share

We will now transfer the database connection file (DBC) from the application server of our EBS environment. We will transfer this to our local directory so that we can create database connections for JDeveloper so that we can run our OAF pages locally during development.


How to do it :

To transfer the .dbc file, perform the following tasks:

  1. Open WinSCP or FileZilla etc and connect to the application server.
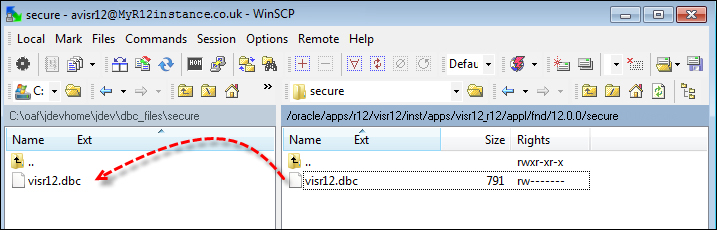
  2. FTP the .dbc file to your local PC from the $INST_TOP/appl/fnd/12.0.0.0/secure dor you can say its path is something like this /u99/appprod52/inst32/apps/PROD_DB/appl/fnd/12.0.0/secure  directory on the application server to the jdevhome\jdev\dbc_files\secure directory as shown in the following screenshot:


    Transferring The DBC File From The Application Server,Oracle DBA,DBA,Oracle Apps,Oracle DBC
Share

Unix for DBA

May 24th, 2017, posted in Solaris
Share

Below are some of the basic unix commands which will be useful for Oracle DBA.

How to kill all similar processes with single command (in this case opmn)

ps -ef | grep opmn |grep -v grep | awk ‘{print $2}’ |xargs -i kill -9 {}

Locating Files under a particular directory

find . -print |grep -i test.sql

Using AWK in UNIX

To remove a specific column of output from a UNIX command – for example to determine the UNIX process Ids for all Oracle processes on server (second column)

ps -ef |grep -i oracle |awk ‘{ print $2 }’

Changing the standard prompt for Oracle Users

Edit the .profile for the oracle user

PS1=”`hostname`*$ORACLE_SID:$PWD>”

Display top 10 CPU consumers using the ps command

/usr/ucb/ps auxgw | head -11

Show number of active Oracle dedicated connection users for a particular ORACLE_SID

ps -ef | grep $ORACLE_SID|grep -v grep|grep -v ora_|wc -l

Display the number of CPU’s in Solaris

psrinfo -v | grep “Status of processor”|wc -l

Display the number of CPU’s in AIX

lsdev -C | grep Process|wc -l

Display RAM Memory size on Solaris

prtconf |grep -i mem

Display RAM memory size on AIX

First determine name of memory device

lsdev -C |grep mem

then assuming the name of the memory device is ‘mem0’

lsattr -El mem0

Swap space allocation and usage

Solaris : swap -s or swap -l

Aix : lsps -a

Total number of semaphores held by all instances on server

ipcs -as | awk ‘{sum += $9} END {print sum}’

View allocated RAM memory segments

ipcs -pmb

Manually deallocate shared memeory segments

ipcrm -m ‘<ID>’

Show mount points for a disk in AIX

lspv -l hdisk13

Display amount of occupied space (in KB) for a file or collection of files in a directory or sub-directory

du -ks * | sort -n| tail

Display total file space in a directory

du -ks .

Cleanup any unwanted trace files more than seven days old

find . *.trc -mtime +7 -exec rm {} \;

Locate Oracle files that contain certain strings

find . -print | xargs grep rollback

Locate recently created UNIX files (in the past one day)

find . -mtime -1 -print

Finding large files on the server (more than 100MB in size)

find . -size +102400 -print

Crontab :

To submit a task every Tuesday (day 2) at 2:45PM

45 14 2 * * /opt/oracle/scripts/tr_listener.sh > /dev/null 2>&1

To submit a task to run every 15 minutes on weekdays (days 1-5)

15,30,45 * 1-5 * * /opt/oracle/scripts/tr_listener.sh > /dev/null 2>&1

To submit a task to run every hour at 15 minutes past the hour on weekends (days 6 and 0)

15 * 0,6 * * opt/oracle/scripts/tr_listener.sh > /dev/null 2>&1

Share

Ways to Open the Windows Task Manager

May 17th, 2017, posted in Microsoft
Share

Ways to Open the Windows Task Manager,Open the Windows Task Manager,Ways to Open,Windows Task Manager,Windows,Task Manager,Windows 10,Windows XP,Windows 7,Windows Server 2012,

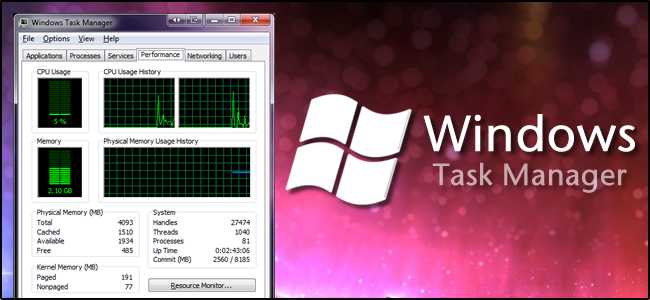
Bringing up Windows Task Manager is not much of a task itself, but when a virus disables Ctrl+Alt+Del and takes it hostage, how else are you going to open task manager? Or maybe you’re just looking for some diversity in your life, so here are six different ways to open Windows Task Manager.


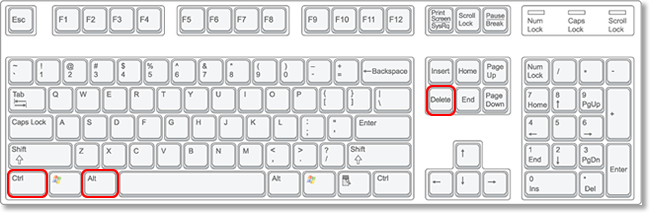
1) Ctrl+Alt+Del

Readers will probably be most familiar with the three-finger salute (AKA Ctrl+Alt+Del). Up until Windows Vista was released, pressing Ctrl+Alt+Del brought you directly to Windows Task Manager. Since Windows Vista, Ctrl+Alt+Del now brings you to the Windows Security screen which provides users with five different options including Windows Task Manager.

Ways to Open the Windows Task Manager,Open the Windows Task Manager,Ways to Open,Windows Task Manager,Windows,Task Manager,Windows 10,Windows XP,Windows 7,Windows Server 2012,


2) Right-Click Taskbar

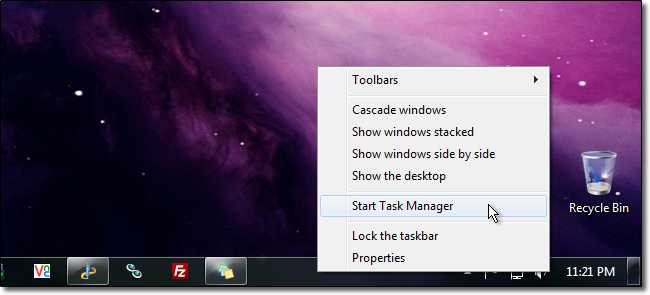
Arguably the fastest way to bring up Windows Task Manager is by right-clicking the taskbar and choosing the Start Task Manager option. It’s just two clicks and voilà! You’re staring at Task Manager in no time! Of course, you could always create an AutoHotKey script to bring up Windows Task Manager even faster with a click of a button

Ways to Open the Windows Task Manager,Open the Windows Task Manager,Ways to Open,Windows Task Manager,Windows,Task Manager,Windows 10,Windows XP,Windows 7,Windows Server 2012,


3) Run taskmgr

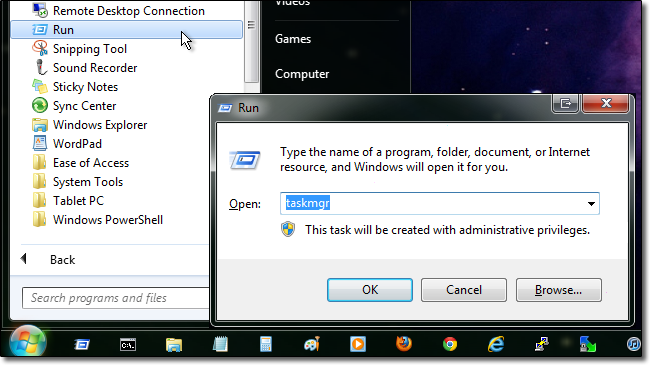
The Run command is a great tool for accessing shared folders, but you can also use it quickly up programs such as Registry Editor or a Command Prompt. Click the Start button then the All Programs folder. Under the Accessories folder click the Run command. You can also press they Windows Key + R on your keyboard or enable the Run command in your Start Menu. Finally, simply type “taskmgr” and hit Enter.

Ways to Open the Windows Task Manager,Open the Windows Task Manager,Ways to Open,Windows Task Manager,Windows,Task Manager,Windows 10,Windows XP,Windows 7,Windows Server 2012,taskmgr,dos command


4) Ctrl+Shift+Esc

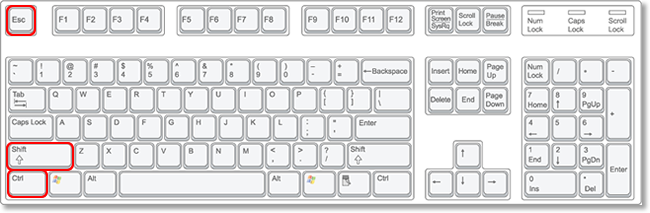
Another quick keyboard shortcut to bring up Windows Task Manager is Ctrl+Shift+Esc. Besides bringing up Windows Task Manager while using Remote Desktop, you can also use Ctrl+Shift+Esc to bring up the task manager while working locally.

Ways to Open the Windows Task Manager,Open the Windows Task Manager,Ways to Open,Windows Task Manager,Windows,Task Manager,Windows 10,Windows XP,Windows 7,Windows Server 2012,taskmgr,dos command


5) Browse to taskmgr.exe

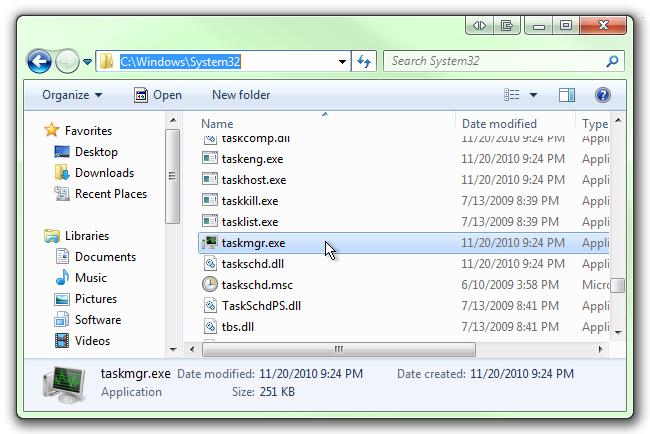
This is definitely the longest way of opening the task manager, but if it’s your only option then it’s better than nothing at all. Open up Windows Explorer and navigate to C:\Windows\System32. The location of taskmgr.exe should be the same in all recent versions of Windows. Scroll down (or search) for taskmgr.exe and double click it.

Ways to Open the Windows Task Manager,Open the Windows Task Manager,Ways to Open,Windows Task Manager,Windows,Task Manager,Windows 10,Windows XP,Windows 7,Windows Server 2012,taskmgr,dos command


6) Create taskmgr.exe Shortcut

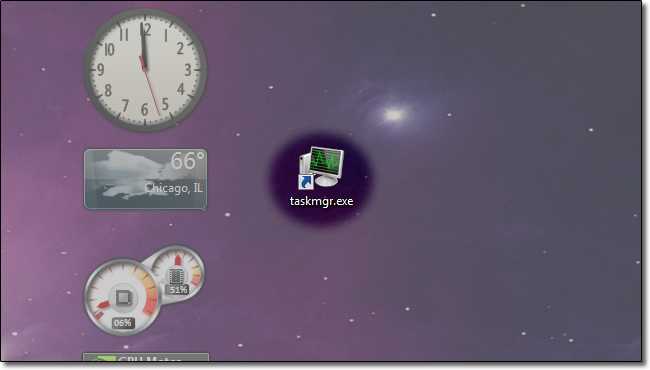
And last on our list is creating a nice, accessible shortcut to the Task Manager on your desktop. Right-click on your desktop and choose New then click Shortcut. A new window will pop up. Browse to the same path as above, C:\Windows\System32. Scroll down until you see taskmgr.exe, highlight it, and then click OK. Click Next, type a name for your shortcut, and finally click Finish.

Ways to Open the Windows Task Manager,Open the Windows Task Manager,Ways to Open,Windows Task Manager,Windows,Task Manager,Windows 10,Windows XP,Windows 7,Windows Server 2012,taskmgr,dos command

Share

Installation Steps Of OAF or JDeveloper

May 7th, 2017, posted in Microsoft, Oracle
Share

If you want to do some OAF Development in JDeveloper for the first time, you will need to do the following things.

1] Download JDeveloper Patch

Based on your instance release level, check out the version of JDeveloper to use using below link.

https://support.oracle.com/CSP/main/article?cmd=show&type=NOT&id=416708.1

You can identify the OA Framework version in your instance by activating diagnostics and click the “About This Page” from any OAF page. Click the “Technology Components” tab. The OA Framework version in the top row of the table can then be matched to the JDeveloper Patch.

Download the JDeveloper Patch.

You can also use this query to find about your version :
SELECT release_name FROM fnd_product_groups;


2] Extract the JDeveloper patch in a directory say D:\DevSuiteHome_1\jdev

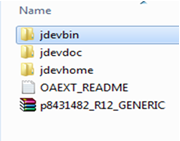
The patch actually contains below three directories

  • jdevbin – Includes an extended version of the Oracle JDeveloper 10g executable and OA Framework class libraries.
  • jdevhome – Includes the OA Framework Toolbox Tutorial source and developer working area.
  • jdevdoc – Contains documentation.

Installation Steps Of OAF or JDeveloper,Oracle DBA,Apps DBA,Application DBA,Oracle Installation,Installation of OAF,Installation JDeveloper

3] Define an environment variable

Define an environment variable JDEV_USER_HOME for your local machine. This has to be set to jdevhome\jdev directory. In above example it has to be D:\DevSuiteHome_1\jdev\jdevhome\jdev.

My Computer Properties Advanced tab Environment Variables New

Variable: JDEV_USER_HOME

Value: D:\DevSuiteHome_1\jdev\jdevhome\jdev

Installation Steps Of OAF or JDeveloper,Oracle DBA,Apps DBA,Application DBA,Oracle Installation,Installation of OAF,Installation JDeveloper,environment file,windows environment file

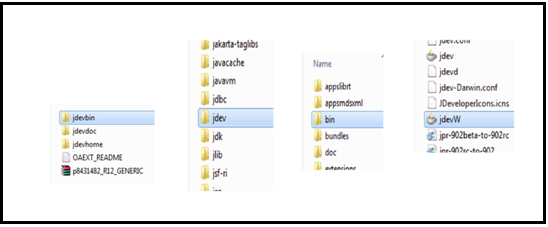
4] Create the shortcut of jdevW

Their you will find jdev and jdevW icons. The jdev is for UNIX environment and jdevW is for Windows environment.
Create the shortcut of jdevW. And send to desktop

Installation Steps Of OAF or JDeveloper,Oracle DBA,Apps DBA,Application DBA,Oracle Installation,Installation of OAF,Installation JDeveloper

Also can be check by this :
http://hostname.com:portnumber/OA_HTML/jsp/fnd/aoljtest.jsp

4] Move the DBC file

After creating the environment veriable we have to move the DBC file from Oracle Apps fnd top to jDeveloper patch.

Here we are using WinScp which connects to the server from our desktop system.
After finding where exactly the DBC file located go to that particular path and copy the DBC file.
(/oracle/apps/r12/inst/apps/visr12_ebsr12/appl/fnd/12.0.0/secure)

After copying, in your desktop system go to
Jdevhome–> jdev–> dbc_files–> secure
Here we will not find any files or documents the folder is empty now we need to paste the DBC file which we copied from the Oracle Apps Instance Server.

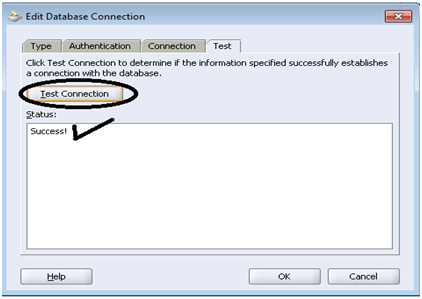
5] Now Test Database

After moving the DBC file now open the JDeveloper and create the Data Base Connection.

After opening the file it will ask for Configure File Type Associations, on check box check all the available types to associate with JDeveloper.

Go to Connections tab after that Right Click on Data Base folder and then select New Database Connection…

1

2 3 4 5

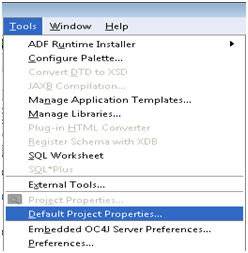
6] Set The Default Project Properties

After creating the DataBase Connections, Set the default project properties.

Go to Tools -> Default Project Properties

1


In that select Runtime connection, adjust the runtime connection information, necessary for the database and Oracle E-Business Suite.

Brows the DBC file from the jDeveloper patch where we moved from the server.
(Jdevhome–> jdev–> dbc_files–> secure)

Username: The user name is Oracle Apps instance User Name
Password:  Password is Oracle Apps instance Password.

Application Short Name: In which application u want to run give the Application Short Name of that application.
Responsibility key: Responsibility key of that application short name.

 Application DBA, APPS DBA, Installation JDeveloper, Installation of OAF, Installation Steps Of OAF or JDeveloper, Oracle DBA, Oracle Installation

Share

Macbook 2015

April 26th, 2017, posted in Apple
Share

Some reviews regarding the Macbook Pro 2015 

https://arstechnica.com/apple/2015/04/ultrabook-plus-the-2015-13-inch-retina-macbook-pro-reviewed/

http://www.t3.com/reviews/13-inch-macbook-pro-review

https://www.notebookcheck.net/Apple-MacBook-Pro-Retina-13-Early-2015-Notebook-Review.139621.0.html


Share