

Archive for June, 2017

Find SIM Registered With Your IDs in Telecom Service Providers
June 14th, 2017, posted in Kingdom, TEChNoLoGYFind SIM Registered With Your IDs in Telecom Service Providers
Overview
‘My numbers’ service allows users to know details about all telephone numbers and data SIM registered with their IDs in Telecom Service Providers systems in order for the users to monitor their numbers and ensure no SIM registered with their names without permissions. CITC is looking forward to ensure user protection, maintain privacy, prevent misuse of user’s credentials by others without permissions.
Steps
Type the ID number of the user and the mobile number registered with that ID. In case the user does not have a subscription, the user can check that by typing the ID details.
Objection
In case any user found a number registered with his name without his permission or found a failure to execute an earlier request to cancel the service by the service provider, a complaint should be reported to the service provider immediately using the complaints services on CITC website choosing the appropriate service provider, complaint type, and providing the details of the SIM number being reported. If there is an objection regarding the validity of the information provided by ‘My numbers’ service and the complaint of the user has not been resolved by the service provider within 15 days, the user can escalate the complaint to CITC.
How to transfer data from your old iPhone to your new iPhone
June 12th, 2017, posted in AppleHow to transfer your data to your new iPhone using iTunes
Here’s the deal: If you make an encrypted backup of your old iPhone using iTunes, then restore it to your new iPhone, it’ll bring most — if not all — your password information along with it. That’ll save you a lot of time and effort getting set back up.
You do need a Lightning to USB cable (or 30-pin Dock to USB if you have an iPhone 4s or earlier), and you’ll still have to re-download apps — the App Store gives you slightly different versions for each device, optimized to run best on that specific hardware — but overall I still find it to be much, much faster.
- Make sure you’re running the most recent version of iTunes.
- Plug your old iPhone into your Mac or Windows PC.
- Launch iTunes.
- Click on the iPhone icon in the menu bar when it appears.
- Click on Back Up Now.
- Click on Encrypt Backup and add a password.
- Skip Backup Apps, if asked. (They’ll likely re-download anyway.)
- Unplug your old iPhone when done.
- Turn off your old iPhone.
- On iTunes on your Mac or Windows PC, select Restore from this backup.
- Choose your recent backup from the list.
- Enter your password if your backup was encrypted and it asks.
- Take your SIM card out of your old iPhone. (If you don’t have a new or separate SIM card for your new phone.)
 Wait for the backup to complete before proceeding.
- Put your SIM card into your new iPhone. (If it didn’t come with a new or different SIM card.)
- Turn on your new iPhone.
- Plug your new iPhone into your Mac or Windows PC.
- Slide to set up on your iPhone.
- Follow the directions to choose your language and set up your Wi-Fi network.
- Select Restore from iTunes backup.
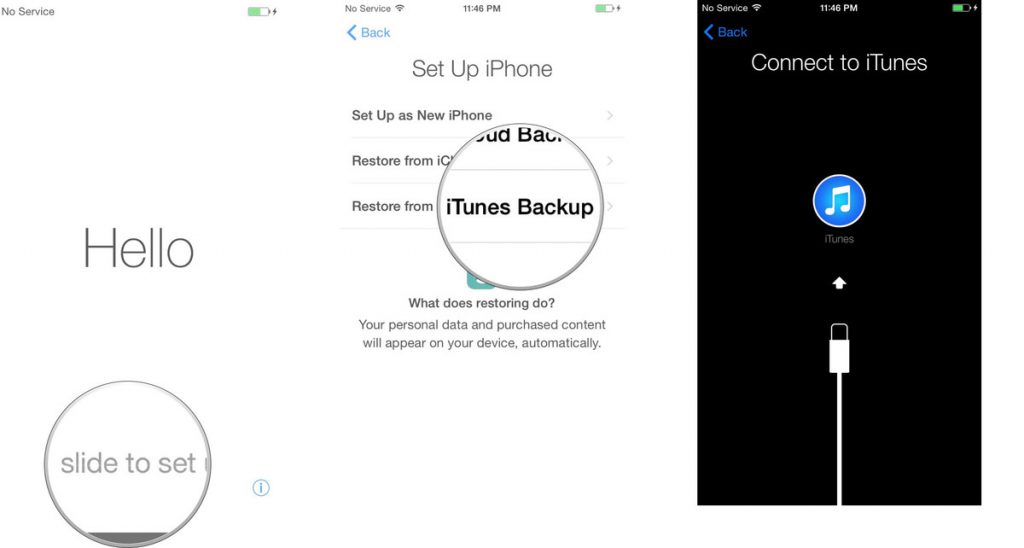
- On iTunes on your Mac or Windows PC, select Restore from this backup.
- Choose your recent backup from the list.
- Enter your password if your backup was encrypted and it asks.

Keep your iPhone plugged into iTunes until the transfer is complete, and on Wi-Fi until all re-downloads are complete. Depending on how much data you have to re-download, including music and apps, it might take a while.Your iPhone might feel warm or even hot, and you might burn a lot of battery life for the first few hours or even a day or due to the radios working and the Spotlight search system indexing. Just let it finish.
They Need From The Comfort Of Their Sofas At The Touch Of A Button
June 10th, 2017, posted in Ink On PAPER, Scarface'S DIARY, TEChNoLoGY, UNiVERSE
The days of trekking to the high street for your shopping needs are over, all you need now to fulfill you shopping needs is a smartphone. Life on the high street is getting increasingly difficult for traders as people can now buy all they need from the comfort of their sofas at the touch of a button.
Now not only can we watch, search and bank online, but we can shop online too. So what are the advantages of shopping online? The service is convenient. Shoppers can purchase clothes, food, electronics, DVDs and CDs 24/7 and they can have them delivered at a time that suits them.
Retailers are now targeting online shoppers by releasing mobile phone apps. The apps are designed to make the online experience easier for their customers.
The Telegraph said: “Shoppers are spending more time checking out shopping websites on their mobile phones and tablets than on desktop computers for the first time ever, according to new research.
“We’ve placed a significant focus on developing our mobile strategy and have more enhancements planned for our app later this year. Customers want to be able to shop seamlessly across all channels and mobile is now the go-to choice alongside visiting our shops.”
With all the perks of online shopping, it is no surprise that high street retailers are disappearing. John Lewis, New Look, Topshop and Tesco are just some examples of retailers who started life in store and expanded and created online stores to keep up with the fast changes to shopping.
Link : https://t.co/VXS8mgN7Tv